Pages

Saturday, October 31, 2015

Now You Have Something to Crow About!


Today I am featuring Pumpkin Crow from Bugaboo Stamps!  I have always loved this image and wanted to create with it....so I finally took the opportunity!  As you can see I  fussy cut the little crow and placed him on the inside of my card too.

This image is great for Halloween or Fall but I also thought it would make a wonderful Congratulations card so that is why I titled this card:
"Now You Have Something to Crow About!"


Today our challenge at Catch the Bug is Black, White and a Pop of Bright! Come play along this week with us.  Check out the inspiration of our DT too!

Today is the last day of Bugaboo's Halloween and Fall image sale!  
Be sure to stop and and pick out some images for your future creations!


Catch the Bug this week and join us!

This card was entered in:
QKR Stampede Challenge #163
Addicted to Stamps Challenge #168

My Recipe:
Image:  Bugaboo Pumpkin Crow
Papers:  SU Pumpkin Pie, Recollections Black, White Cardstock
Ink:  Copics
Tools:  Lots of Labels Framelits, Die Namics Blueprints 20, Cuttlebug Pumpkin Harvest Embossing Folder, SU Mat Pack

Accessories:  Enamel Dots, Wink of Stella

Happy Halloween!
Be Safe!


Friday, October 30, 2015

Stockings Were Hung! 


It's Freebie Friday at Bugaboo.  This whimsical Santa image is yours free.   Just stop by the Bugaboo store to get Santa Stockings. Also stop by Catch the Bug for more inspirations from the Bugaboo DT.

I kept trying to get a good photo of this card.  It is not crooked in any way!  However, for some reason the lens distorted the right side of my card....think it may have something to do with the ribbon.   But at least you get the idea.  

Tomorrow is the last day of the Halloween and Fall image sale at Bugaboo.  Be sure to get your discounted images.  


My Recipe:
Image:  Bugaboo Stamps Santa Stockings
Papers:  SU Cherry Cobbler, White Cardstock
Inks:  Copics
Tools:  DieNamics Backgrounds #20, Sizzix Phrases Merry Christmas #2
Accessories:  Ribbon, Versa Marker, Glitter

This card was entered in:

Wednesday, October 28, 2015

Bugaboo Santa Snow Globe 
Shaker Ornament

featuring Bugaboo Stamps 

and 


Today is the fourth Wednesday of the month and that means it is 
Tutorial Wednesday at Catch the Bug.  

As a Guest Designer I have the privilege of sharing a tutorial with you. 
 So today I have chosen to show you 
how to make a Snow Globe Shaker Ornament.  

I will be featuring Bugaboo Stamps 
and 

The Santa image will be the main focal image for the snow globe.
You will only use the base of the Snow Globe-Reindeer Silhouette image for this snow globe ornament, although any of Bugaboo's images or snow globe images would make a great shaker ornament! Be creative and have fun!

Begin by printing the images:

 Print AKV Santa - Sled image to fit a 3 1/2" circle
(Windows Photo Viewer use Wallet Size)

Print three Snow Globe - Reindeer Silhouette images 
 (Windows Photo Viewer use 4x6 size)
(Or Base will measure just under 3") 
You will only be using the base of this image. 
One copy is for the base. 
One copy is for the banner.
One copy for a cutting template.


1.  Cut a 5mm piece of foam using a 3 1/2" circle die cut by running it through your die cut machine.  I found my 5mm foam at Hobby Lobby.
2.  Then using a 3 1/4" circle die cut...cut the inner circle to create a Foam Frame piece.
3.  The inner foam circle piece can be used to cut out the Foam Base of the globe.  Use one of  your printed base images to make a template to use for cutting out the foam.


4.  Using a piece of sticky note tape...tape together your base and also the Santa Sled image already cut out to match the size of the frame (3 1/2 " Circle die).
5.  Using the taped two images, trace a template to use for the back of the globe.  This will be used in No. 8. and No. 16.


6.  Using watercolor paper and Taylored Expression Snowfall Embossing folder ink the inside of     the folder (smooth, recessed side) with Tim Holtz Distressed Ink Tumbled Glass.  I used the foam pad to soften or smooth the ink on the folder before running the embossing folder through die cut machine.
7.  Run folder through die cut machine.  The ink will transfer to your watercolor paper.  Love this technique!
8.  Use your template in No. 5 to cut out the Snowfall Background.
9.  Using Watercolor paper, ink the paper in a circle.  Then use the two dies you used to cut out the Foam Frame (31/2" and 3 1/4" Circles) to cut out the Frame of your snow globe.


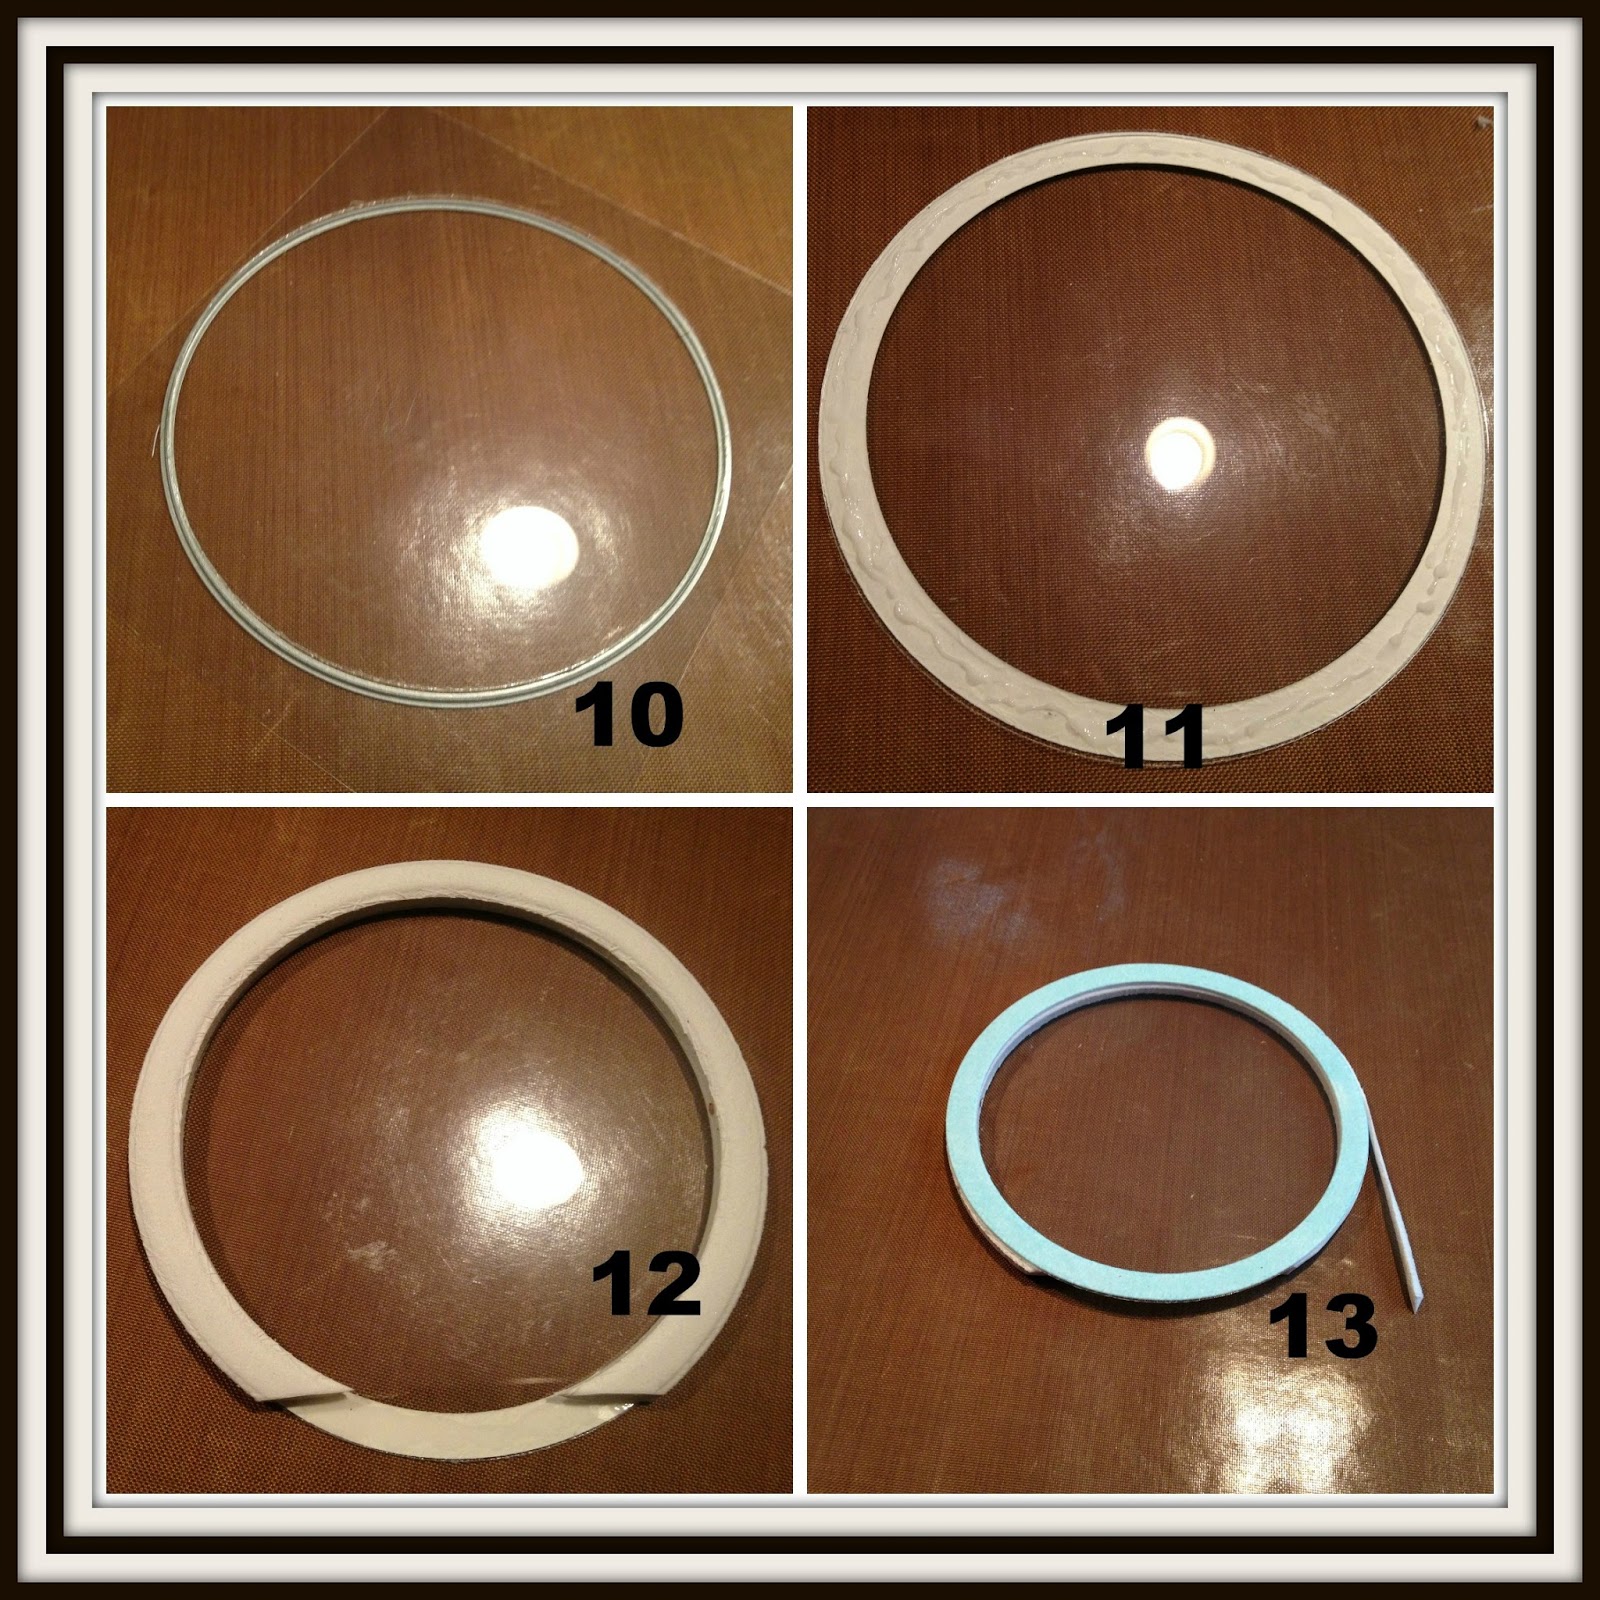
10.  Cut a piece of acetate film using the 3 1/2" circle die.
11.  Glue the Acetate Circle to your back of your Frame.
12.  Trim the bottom of the Foam Frame to fit perfectly next to Foam Base. See No. 14. Then glue the Foam Frame to the back of the Acetate Circle and Frame.  Let dry.
13.  Trim any excess foam.  Color the side or edge of the Foam Circle and the Foam Base using a matching marker.  I used Copic B00 to match the Tumbled Glass.


14.  Glue Foam Base to Frame, Foam Frame and Acetate Circle.
15.  This is what it will look like when you turn it over.
16.  If you wish to have a finished back, make a Backing Piece for your snow globe using your template.  I used watercolor paper and tumbled glass ink for the globe and my copics for the base to create a wood look.
17.  Now make sure everything matches up.  Glue the Front Base to the Frame piece.  Do not glue the snowfall piece yet!


18.  Glue your ribbon for a hanger between the Snowfall Background and Backing Piece.
19.   Fussy cut image and glue to Snowfall Background and add Darice silver stars with added jewels making sure image is secure so that sequins do not get caught behind the image.
20.  Turn Front Frame over and add sequins and seed beads.  Glue front and back together and let dry. 
Wrap base with your favorite ribbon, add a snowflake with a pearl and then add the Merry Christmas banner.  

Liquid craft glue is your best friend for this project....however, I did use glue dots to attached the silver stars and the Merry Christmas banner.

Hope you enjoyed the tutorial!  If you have any questions, please leave me a message.
Now go have fun with some Bugaboo Stamps!  


My Recipe:

Images:  Bugaboo Stamps AKV Santa - Sled, Snow Globe - Reindeer Silhouette
Papers: White Cardstock, Watercolor Paper, Acetate, 
Silly Winks 5mm Foam from Hobby Lobby
Inks: Copics and Tim Holtz Distressed Ink Tumbled Glass
Tools:  Lifestyle Nesting Circles, Taylored Expressions Snowfall Embossing Folder, Rangers Multi Matte Medium, Glue Dots
Accessories:  Darice Stars, Clear Jewels, Black Jewels, Ribbon, Snowflake Brad from Hobby Lobby, Pearl, Wink of Stella, Tulip Puffy, Glitter, Sequins, Seed Beads

This ornament was entered into:

Merry Christmas!
It is just around the corner!

Happy Brrrrrthday!


Today I am using this darling Winter Birthday image from Doodle Pantry.  It is such an adorable birthday set with several images, outlined or colored, along with several sentiments and some fun matching papers to use with the images.  Since I had seen this image used with the printable papers, I decided to head to my own stash.  I immediately fell in love with this corrugated paper and then found the perfect dot paper to use behind it.  I hope you like it!

Doodle Pantry is our sponsor this week at Sweet Sketch Wednesday 2!  They will be offering a
$10 Coupon
to use in their store if you are the lucky
Grand Prize Winner at SSW2!

This is the sketch we are using! 
 Be sure to follow all the rules on the SSW2 site!


"Doodle Pantry takes pride in creating a diverse selection of doodling styles, like realistic or whimsical, and all of which are family and kid friendly illustrations.  We hope you enjoy our wide variety of styles for every family occasion!"


My Recipe:
Image:  Doodle Pantry Winter Birthday
Papers:  Authentique Latest and Greatest, DCWV Spring & Summer Corrugate Stack, SU Pumpkin Pie
Tools:  Spellbinders Classic Ovals Large and Classic Scalloped Ovals Large
Accessories:  Ribbon, Sequins and Stickles


Tuesday, October 27, 2015


Halloween Pumpkin Tree Silhouette

I have another fun and easy Halloween Silhouette card to share with you today.  Jodie at Bugaboo Stamps has created so many fun silhouette images for you to add to your collection.  These silhouette images are quick and easy to make a last minute card for a special friend or to make your cards in mass production!  Be sure to stop by Catch the Bug and see all the great inspiration from the rest of the DT.  And also stop by the shop to see all the new releases for the week.  There are a few more day to take advantage of the Halloween and Fall Image Sale too!


My Recipe:
Image:  Bugaboo Halloween Pumpkin Tree Silhouette
Papers:  Bo Bunny Spooktastic Smell My Fee and Spooktastic Stripes, SU Elegant Eggplant and Gumball Green
Inks:  SU Elegant Eggplant, Copic 
Tools:  Spellbinders Small and Large Deckled Rectangles
Accessories:  Ribbon and Pumpkin Button

Saturday, October 24, 2015

Autumn Owl

This image, Autumn Owl, is a new fall creation at Bugaboo.  I hope you enjoy my card with this fun new image!

For our Saturday Challenge this week, Bugaboo has provided the photo below for your inspiration.  Take time to play along! You may be the lucky winner of some fun Bugaboo images of your choice.


We hope you will join us at Catch the Bug!

Just another reminder that Bugaboo has a Halloween and Fall Image Sale going on through the end of the month.  Be sure to stop by and check out all the fun images.

 http://www.bugaboostamps.com/HalloweenFall_c_102.html

 
This card was entered in:
Dragonfly Journey - October Colors/AG

My Recipe:
Papers:  Debbie Mumm Harvest & HolidaySU Pumpkin Pie and Old Olive
Ink:  Copics
Tools:  Deco labels framelits, Lifestyle Circles
Accessories: Brads and Ribbon


Tuesday, October 20, 2015

Happy Halloween

It's Tuesday and that means it's New Release Day at Bugaboo Stamps.
Today I am using Halloween Circle Silhouette.  This is such a fun and easy image to use to create your last minute Halloween Card.  Be sure to stop by the Bugaboo Stamps store and pick up your image and be sure to browse around.  The Halloween and Fall images are still on sale through the end of the month.


This card  was entered as #267 in Crafting With An Attitude Challenge #8.

My Recipe:

Image:  Bugaboo Halloween Circle Silhouette
Papers:  Doodlebug Designs October 31st Spooky Firends, Recollections Black, Bazzill Circus Peanuts,
Inks:  Copic YR14, SU Summer Sun and Basic Black
Tools:  DieNamics Background 20,  Spellbinders Classic Ovals Large and Lacey Ovals, Quickutz Photo Corner
Accessories:  Celebrate It Ribbon


Saturday, October 17, 2015

Wish Big!

Isn't this the cutest Birthday Bear!  I just love him!  You can find him here!  Today is our Saturday Weekly Challenge at Catch the Bug and we are playing Bugaboo Bingo.  I have used Buttons, Pearls and this Bugaboo image.


I hope you will Catch the Bug this week and join us by playing along and showing us what you create with a Bugaboo image!
 Just two more weeks for Bugaboo's Halloween and Fall image Sale!  Be sure to stop by and pick up your favorite images!
My Recipe:  
Image:  Bugaboo Birthday Bear, SU Short & Sweet
Papers:  My Mind's Eye -Hootenanny, SU Watermelon Wonder, Brocade Blue
Inks:  Copics and SU Night of Navy
Tools:  Spellbinders Wonky Rectangles, Lifestyle Nesting Circles, SU Ticket Corner Punch
Accessories: Ribbon, Pearls, Buttons, Wink of Stella


I have entered this card in:
Craft Your Passion ~ AG 283
Not Just Cards Challenges ~25

Friday, October 16, 2015

Halloween Pumpkin

Well, today is Freebie Friday and this is the fabulous Halloween image you can receive at Bugaboo Stamps today.  Be sure to stop by and check out all of Bugaboo Stamps while you are there.


Bugaboo Halloween and Fall images are also on Sale now through October 31.  

My Recipe:
Image:  Bugaboo Halloween Pumpkin
Papers:  Doodlebug Designs 6x6 pad Fall Friends, SU Eggplant Envy, Lucky Limeade
Inks:  Copics
Tools:  Spellbinders Classic Ovals Large, Lacey Ovals
Accessories:  Ribbon, Brad


Tuesday, October 13, 2015

Cat and Rat Birthday Party

Today is New Release day at Bugaboo Stamps.  The image I am using today is Cat and Rat....such a cute birthday image!  Be sure to stop by and see all the new releases at Bugaboo.


Just a reminder that Bugaboo has a Halloween and Fall Image Sale going on through the end of October. Stop by and pick up your fall images!
My Recipe:
Image:  Bugaboo Cat and Rat
Papers:  Kathy Davis Hello Sunshine, SU Yoyo Yellow, KMA Terrific Teals
Inks:  Copics
Tools:  Spellbinders Large and Small Labels, Cuttlebug Happy Birthday Embossing Folder 
Accessories:  Sugar Dots, Jewels, Flowers, EK Sticko Sweet Treats, Stickles, Glossy Accents


About Me

My photo
Welcome to Sweet Bloomin Scraps. My name is Judi. As you can see, my blog is a little of everything from crafts to cooking and sewing. My two sisters, Nancy and Arlana,are my greatest inspiration. Thanks for visiting my blog. I hope you will come back often.

Arlana Patten, Owner

Bugaboo Stamps

A Day for Daisies

Digi Stamp Boutique

Cute As A Button

Doodle Pantry

Meljen's Designs

Fresh Brewed Designs

Clear Dollar Stamps

Elisabeth Bell

Saturated Canary Digis

The Stamping Boutique

Stamp Fairy

Deidre Mosher Designs

Sassy Cheryl's

Wee Stamps

Digi Stamp Characters

By LORi Designs

Tiddlyinks

Di's Digi Downloads

Sparkle Creations Rubber Stamps

Digi Doodle Shop

Amber Inks

Robyn's Fetish Digital Stamps

Sweet 'n Sassy Stamps

Whimsie Doodles

Pixie Dust Studio

Prairie Fairy Designs

Inktegrity

Bee Crafty

Delicious Doodles

Busy Beauties Boutique

My Grafico

Squiggle Fly

KML Digital Designs

Mo Digital Pencil

Shirleys 2 Girls

Soft Pencil

Ippity In My Bucket

Say It With Stamps by Jen

Arlana's New Blog

Arlana's New Blog
"Sweet Things Handmade"

Blog Archive

Blog Widget by LinkWithin

My Blog List

Grab A Button